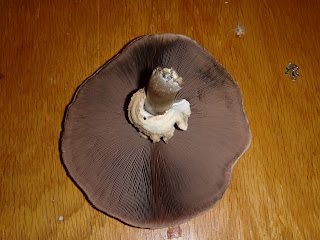
I parked my car and found these babies sitting next to the curb, I was able to get my very first spore prints with them!
Here are spore print instructions from
http://www.mushroomexpert.com/spore_print.html
Making Spore Prints
by Michael Kuo
While a single mushroom spore can't be seen by the naked eye, a pile of many spores can--and the color of a mushroom's spores, seen en masse, is a crucial identification feature. Obtaining a mushroom's "spore print" is therefore an essential step in the identification process.
Before going through the nuts and bolts of making a spore print at home, it is worth noting that mushrooms frequently make their own spore prints, in nature. If you have ever noticed colored dust covering a leaf or the ground beneath a mushroom's gills or pores, you have probably witnessed this phenomenon. Tightly clustered mushrooms, in fact, frequently leave spore prints on one other, since caps overlap.
In order to make a spore print at home, you will need to have a relatively mature mushroom. Buttons, young mushrooms, and mushrooms with some kind of a covering over their gills or pores (a partial veil) are not likely to drop spores in order to make a print.
Remove the stem from smaller mushrooms and place the cap, gills or pores downward, on a piece of paper or glass. For larger mushrooms, slice off a section of the cap and use only the section. Place a cup or glass upside-down on top of your mushroom, to keep air currents away.
While some spore prints can appear within a few hours, it's often best to wait overnight, just to be sure. When you remove the cup and lift the mushroom cap, you should find a "print" like the ones illustrated to the right. If you have been careful not to move the mushroom while the print was developing, you may find that the spore print reflects the pattern of the mushroom's gills or pores, since the spores fell directly downward.
Some field guides advocate using black paper for spore prints, since white prints show up more easily. Then again, brown and black prints don't show up on black paper as well as they do on white paper. I have solved this problem for myself by using glass, which can be held against light and dark backgrounds, rather than paper. In fact I usually use a microscope slide, since I will also be examining spores under the microscope--but if you are not going to be using a microscope, any (safe) piece of glass will suffice.
The color of the spore print is what you will compare with descriptions from field guides and keys. Interpreting color can be very subjective--and mycologists have tried several times to "standardize" the interpretations, without much success. But while subtle differences (like, between "white" and "creamy") may be perplexing, distinguishing a white spore print from a brown one or a pink one is easy enough, and it will help you enormously in identifying a mushroom. More information on assessing colors, of spore prints and the mushrooms themselves, can be found on the page for the genus Russula.
For mushrooms belonging to the Ascomycetes, like the morels and false morels, a spore print is obtained using a similar method. However, since these mushrooms have tiny spore jets that forcibly eject the spores, you will place a piece of the cap on the paper or glass and expect the spore print around the mushroom section (as well as underneath it, if you have placed the spore-producing side downwards).


Love the finished product there. That looks so easy to do.. I could try that sometime..
ReplyDeletecubensis spore syringe
Thank you for commenting! it is a blast and interesting
ReplyDeleteI love mushrooms and would love to be able to grow them myself in the kitchen! spore syringe
ReplyDelete